Bad Game Dev Habits

Man using a laptop to code with the text "Bad game dev habits & how to beat them" overlaid.

Bad Game Dev Habits & how to beat them

I was talking with some friends the other day about bad game dev habits when it comes to making games. Since I seem to have more than my fair share of them, I decided to write a blog about them and how I am working to prevent them.

For those of you who don’t know, I have been coding for at least 35 years.  I learned my craft back in the days of 8 bit computers and BASIC.  I am also entirely self-taught, so I have no doubt picked up a few bad habits along the way.

Let me tell you about some of the worst habits I have with regards to game development. As well as what steps I am taking to avoid repeating them in the future.

Not commenting clearly

This is a big one for me, as I am a champion for clear and concise commenting in projects.  I’ve even written about it previously >here< on the blog.

Comments which make sense six months down the line can save hours of reading through the code when you return to the project.  Especially if you have been working on other, completely different things in the meantime.

I try and leave single line comments which describe what a variable is or does, above the line where the variable is defined.

//	Sets the players initial velocity
player.yVelocity#=0.0

I also leave blocks of code at the top of a function definition.  These contain the usage parameters of the function, as well as a couple of lines of code with a usage example or any information which may be helpful.

//********************************************************************************
//	null = UpdateZones( speed# as float)
//********************************************************************************
//	This function updates the positions of the zone sprites and maintains the 
//	distance variable
//********************************************************************************

Lastly, I also leave the occasional comment on blocks of code to explain what it does where necessary.  Some code is so simple that it doesn’t need a comment.  Sometimes a single comment will suffice for four or five lines of code.

//	Creates the sprite and sets the properties
bgLayers[layerID].spriteID[0]=CreateSprite(imgID)
SetSpritePosition(bgLayers[layerID].spriteID[0] , 0 , 0)
SetSpriteSize(bgLayers[layerID].spriteID[0] , width# , height#)

Even with Flappy-vaders, I recently found myself trying to find out what a variable did because I had not commented it, or indeed given it a sensible name.  This leads us nicely onto the next section…

Poorly named variables

When I first learned to code on the ZX Spectrum, all some variables* had to have single character names.

Nowadays there are few limitations on variable naming outside of coding conventions.  The trick with variable naming is to use as few words as possible to accurately describe what the variable is or what it does.

So when I was working on Flappy-vaders the other day, and found a variable called missionTotals which itself is quite an ambiguous name, I was understandably miffed.  But to add insult to injury, I hadn’t left a comment explaining what the variable did either.

I eventually found comments in another function which explained what the variable was intended for, but again, that was time wasted looking through the code which could have been better used for writing it.

* I had mis-remembered this, It was only some variables, like strings or for/next loops which required a single character name.  For regular variables, you were much freer and could even use spaces (although the compiler ignored these)

Overwriting graphical projects with single layer images

It’s not just the programing side of things where bad habits can cause hours of extra work down the line.  Graphical assets are just as susceptible.

One of the most frustrating things I have found myself doing inside Paint .net (my favourite free paint tool) is removing the layers of a project file so I can copy/paste the image into another image, and then accidentally overwriting the original project file with the single layer one.

This could easily be avoided by copying the existing project file into the new project folder, leaving the original existing project file untouched.

Not saving the ttf file or even writing the font name down

Sometimes you need a specific font style to base a logo around or the like.  You know what it’s like.  Hunting around font sites looking for the perfect font.

It doesn’t usually take too long to find a few suitable candidates, and before you know it you have the logo created, and saved and forgotten about.

Until the next year, when you need to reproduce the logo in a higher resolution for some promotional material.  But you’re on a different PC now, this new one doesn’t seem to have the font you used installed.

Thanks to the time which has passed, and the fact that the project you worked on needed a dozen fonts, you have absolutely no idea what the font you used for the logo was.

I have lost count of the number of times I have done this.

These days when I am doing this, I not only write down the font name and URL, but also the sizes and whether or not I used Bold or Italics.  I also ensure the font .ttf file is stored in the project folder with its license file.

Leaving (often rude) debug stuff in production

As I said at the beginning of this post, I learned to code in the 80s on a ZX Spectrum, using BASIC.  There was no fancy IDE with auto code complete and intellisense.  And there definitely wasn’t any debuggers or tools like code stepping or break points.

I learned early on that if I needed visual confirmation of a section of code was being executed, I could simply drop a print statement into the code to display on screen that the code had been executed ok.

This is how I prefer to debug now.  It comes as second nature to me.

Now somewhere along the journey through the years, I started using random words to make it easier to track down debug statements.  I could simply use the search function to look for the specific word I had typed in the print statement.  The more unique and less likely to appear in other comments, the better.

Because I have the mind of a 14 year old boy at times (we never truly grow up), a lot of these unique debug phrases were erm, rude.  Often they were several words strung together, any one of which would have your granny clutching at her pearls.

Now, sometimes, these debug lines hide in the depths of the code, and only show themselves on very very rare occasions.

So occasionally that they have gone unnoticed when we are cleaning up a project ready for release to production.

On at least one occasion, they have made it onto the store!

These days I use a simple search of the entire project for every Print or Debug.Log command in the entire project and make sure that they are commented out.

Conclusion

That’s I think all I can think of for this post.  I’ll leave you with some general advice which will hopefully save you from wasting hours of your time in the future.

  • Make sure you save often, and back up your project.  Use a source repository like GIT, especially if you are working as a team.
  • Ensure you have a copy of every asset used in the creation of all the assets you make.  Put them all in a folder, and never use the original file to work with, always copy it and work with the copy.
  • Keep a written log of what you have done/changed and what you are planning to do next. I find OneNote is ideal for this.

I hope this post is of some help to you all. Feel free to get in touch with me to let me know about your bad game dev habits.

Comment First Coding

Comment first coding

Comment first coding is a technique that I have used for many many years, but only today found out it has an actual name! (I had a jolly good Google before starting writing this post).

I find it especially useful when I am coding in a language which I am not overly familiar with.

The basic premise of Comment first coding, is planning out what you want your code to do using either plain English, pseudo-code or a mixture of both, in comments.

Then going through one comment at a time, actually writing the code proper.

	//db-jointeam.php - POST(team ID), find playerID from username ($_SESSIONS variable)
	//	If playerID = specified Team's ownerID
	//		Add player to teamlobbyplayers
	//		Set isActive to 1
	//	Else
	//		If isActive = 1
	//			Add player to teamlobbyplayers
	//		Else
	//			Error, lobby not active
	//		Endif
	//	Endif

Above is an example of some Comment first coding from a project I am working on which uses PHP to access a MySQL Database which holds the games player and team data.

Conclusion

And that’s pretty much all there is to Comment first coding. Like I said earlier, I find this technique to be extremely helpful generally, but more so when I’m using a language which I’m not overly familiar with.

Rubber Duck Debugging

Introduction

Rubber Duck Debugging (or simply Rubber Ducking) is one of the most crazy sounding debugging techniques available to programmers.

The premise is simple, when you get stuck with a problem with your code that the usual debugging techniques have failed to solve, then simply grab an inanimate object and explain to it slowly and step by step what your code does.

How does it work?

There are a few reasons why Rubber Ducking works.

Firstly, when you’re explaining your code to your duck, your are forcing your brain to think about the code much more slowly than when you are simply skimming over the code and thinking about it in your head. This in turn allows your brain more time to consider exactly what is happening in the code.

Secondly, explaining to your Duck switches your focus from an observer of the code, to that of a Teacher. This change of mindset causes you to evaluate your code from a different perspective, which can in turn help with finding and fixing bugs.

It might sound silly (and you’ll probably feel quite silly when you first start talking to a rubber duck), but you would be surprised how well this technique actually works. Especially for logic problems which aren’t easy to spot when simply checking variables in the debug console.

Why a rubber duck?

The name Rubber Duck Debugging comes from a story in the book “The Pragmatic Programmer” by David Thomas and Andrew Hunt, where a programmer would carry around a rubber duck and explain his code to it.

You can of course use anything you like. If you want to explain your code to your mug, then feel free. If you have a favourite cuddly toy then they would be just as happy to listen to you.

Pets can also work, although it’s a little frustrating when they walk off halfway through your explanation.

I’ve even successfully rubber ducked with my girlfriend (who has absolutely no idea about code or computers) whilst taking a relaxing evening walk away from the house and PCs.

Conclusion

I hope you have found this post interesting, and that it gives you another tool to use the next time you’re sat in front of the PC tearing your hair out because you cannot get the code to work.

Nine slice scaling

Introduction

One of my favourite visual effects in Flappy-vaders is the CRT TV style border around the screen, making it look very similar to what I remember my ZX Spectrum looking like back when I was little.

Creating the border graphic was fairly straight forward using Paint.net, but implementing it in game was slightly trickier.

When I initially put the border in place, I simply resized it to fit the dimensions of the screen. Which works fine when working on a screen the same aspect as the original image, but when using screens of different aspects then distortion soon becomes apparent in the corners and edges of the image.

The easiest way I could think of to remedy this was to use a technique called Nine slice scaling ( or sometimes 9 Slicing, or Scale 9).

How it works

Nine slice scaling is a way of scaling 2D images proportionally, which helps maintain rounded corners, borders and the like.

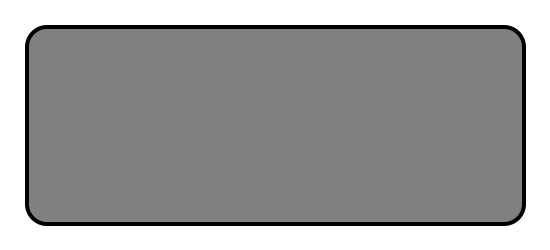
Normally Nine slice scaling is used for buttons or UI panels, where you would divide up a panel like the one below into 9 pieces, but it works just as well for the CRT TV outline shape as well.

Now, with the shape above, you can see that if you were to stretch it horizontally the corners would deform, becoming elongated horizontally, as would the borders on the left and right sides of the box.

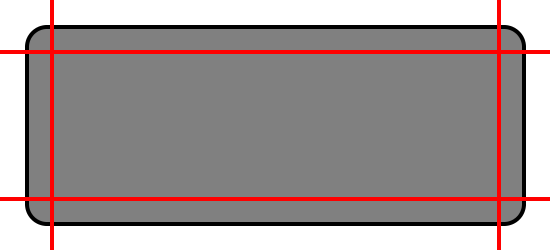
With the Nine slice scaling, you divide the box into 9 smaller sections. And resize them all individually. The corners remain the same size no matter what happens. The top and bottom edges can resize horizontally but not vertically, and the left and right edges are resized vertically but not horizontally. The middle section is resized both horizontally and vertically as this has no details which can be distorted.

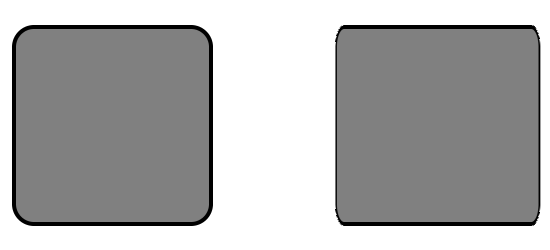
In the image above, the shape on the left has been resized using the nine slice scaling technique, the one on the right has just been resized to fit. You can see the difference in quality.

This technique means you can simply have 1 image for all the different sized buttons your UI needs, or for all your UI Panels etc.

Use in Flappy Vaders.

I decided to use 8 individual sprites, as I don’t want the big middle piece to be used for the border. This prevents the device from having to render a huge chunk of alpha transparency, which is never good for performance.

I also converted the original image into a texture atlas, so I could assign the sprites the correct section of image. Using texture atlases also speeds up render times because fewer draw calls are made.

Conclusion

And that’s all for now 🙂 I hope you found this blog informative.

Comments

Welcome to the first of the blog posts relating to our second P in the list, Programming!

Comments

Today I’m going to be talking about commenting code. Something I was first introduced to back in the 80’s with the Rem command on my ZX Spectrum. My commenting back then though was limited to a small asterisked box at the top containing the name of the project and my name, and then the occasional comment at the top of a section labelling it as the “movement bit” or the “game over bit”.

Now as with GDD’s there are those out there who advocate for commentless code, saying that if the code is well written that comments are un-necessary. And while this is perhaps true to a degree, I find it quicker to read a commented description of what a function does rather than having to read through the code to discover it.

That being said, comments can sometimes be used to explain bad code rather than rewriting the bad code into something better. Which isn’t an ideal practice.

And even worse are bad comments. I’m guilty of writing some of these myself, especially late at night after a beer or two. I’m sure you’ve all seen comments like “This is the bit that does the thing”. Comments like this are a complete waste of time and definitely should be avoided.

Writing useful comments

I find comments to be exceedingly helpful, especially when I’m returning to a project which I haven’t touched for a while. When you’re working in a team comments can easily inform a team member what code does, or how.

So, how to write good comments? The first piece of advice I can give you is to make your comments clear and concise. Don’t assume the person reading the comments has any idea of how the code works so please avoid using ambiguous terms in them.

Try to keep comments brief. Apart from a comment block at the start of a script file which can be any length really without disrupting someone trying to read the code. Even for a function description there is no real reason to use more than two or three lines of comments.

When it comes to commenting source files, I always try and include a header comment block which gives details like what project it’s from, what the file contains, and in the case of the main source file, a revision history. As I said earlier, it doesn’t matter so much about the length of this first comment block as it doesn’t interfere too much with reading the code. But obviously don’t write the comment equivalent of Tolstoy’s War and Peace.

Another thing I find really helpful to comment is variables. I usually leave a single line comment above the variable declaration describing what the variable keeps track of, I find this combined with a fairly clear variable works well.

//	Sets the players initial velocity
player.yVelocity#=0.0

I also add a comment block to the top of every function definition. This contains the usage details of the function, as well as a couple of lines of description.

//********************************************************************************
//	null = UpdateZones( speed# as float)
//********************************************************************************
//	This function updates the positions of the zone sprites and maintains the 
//	distance variable
//********************************************************************************

As for the rest of my code, I certainly don’t comment every line as some code is so obvious that it’s not necessary. Instead I add a title comment at the start of a particular bit of code, be it in a loop, or a function, or wherever, and then a comment which breaks down what the next few lines are doing.

//	Creates the sprite and sets the properties
bgLayers[layerID].spriteID[0]=CreateSprite(imgID)
SetSpritePosition(bgLayers[layerID].spriteID[0] , 0 , 0)
SetSpriteSize(bgLayers[layerID].spriteID[0] , width# , height#)

Practice makes perfect

When it comes to commenting, there is no better way to get experience than actually writing some. Just remember to keep them concise and useful. There is no better feeling than returning to some code after a break and be able to just pick it up where you left off thanks to the brilliant comments you’d left 🙂